If you want to migrate to a new harddisk, wheather that's a SSD, NVMe or a plain old HDD, you could just start from scratch, or you could simply copy the entire harddisk, partitioning table and all, to your new harddisk.
This method works with both Windows and Linux (Mac was not tested, but there's no reason it shouldn't) and saves you many hours of watching progressbars complete.
TL;DR
Simply the fastest and easiest way to clone the contents of a disk to another disk is using the pv-command:
# Replace /dev/sda with the SOURCE disk
# Replace /dev/sdb with the TARGET disk
pv < /dev/sda > /dev/sdb
Prerequisites
- The new disk, which should be of equal size or larger.
- A bootable USB-stick with any lightweight version of Linux, Lubuntu for eample. Any other computer running Linux would also do;
You could use Unetbootin to set-up your drive properly. - A computer or laptop where you can hook both the old and the new harddisk to.
This requires a SATA to USB converter, HDD docking station or spare SATA slot; - A proper back-up of your files, in case everything goes up in flames.
Setting up
- Put your new harddrive into it's final destination, for example inside the laptop.
Ensure the laptop is completely turened off and not in Hybernation (since this will cause Windows to lock partitions). - Hook the old harddisk to it's temporary destination using the SATA to USB converter, HDD dock or, if available, the spare SATA slot.
- Boot from your bootable USB into your Linux distro and you're ready to go.
Migrating
1. Determine the source and target drives
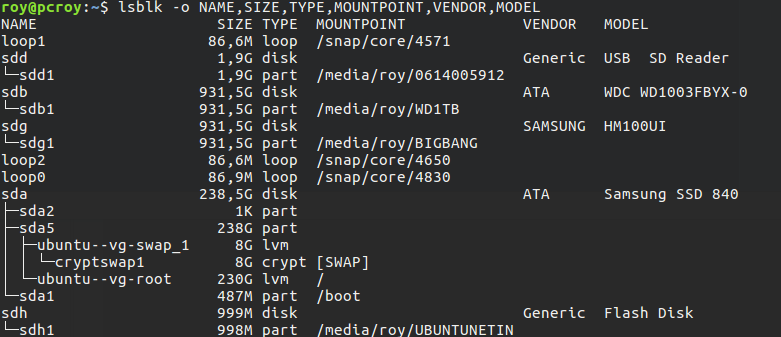
First we need to find out what's the source and what's the target drive. To do this, ether use GParted or (even better) open up a Terminal window and use lsblk:
# Add Vendor and Model to the output to make recognition easier.
lsblk -o NAME,SIZE,TYPE,MOUNTPOINT,VENDOR,MODEL
The output shoud look something like this:

Note the Vendor and Model columns and the disk size columns to find out whis drive is the source or the target. When in doubt, use GParted to be sure you're on the right path.
Remember or write down the device's name, usually something like "sda", "sdb", or something like that. Only the names without a numeric suffix are devices (others are partitions).
2. Start cloning the drive
Now we've determined the source and target devices, we'll start the copy progress. You could simply use dd to accomplish this:
# Ensure to prefix the device names with "/dev/"
sudo dd if=/dev/sda of=/dev/sdb bs=4096
The only downside with dd is that the actual copy speed could be improved by choosing the proper value for bs., which can only be properly determined by testing different values.
The alternative is using pv, which determines the optimal speed by itself (and I find the syntax way easier too):
# Since pv is not installed by default, we have to manually install it.
# Ensure you have a working internet connection.
sudo apt-get install pv -y

# Replace /dev/sda with the SOURCE disk
# Replace /dev/sdb with the TARGET disk
sudo pv < /dev/sda > /dev/sdb
Simply let the process run, be patient. When the process completes, simply shutdown (properly) the host.
3. Booting up the first time
When the process is done and your computer has been powered off, remove the USB and the old harddisk and power the computer back on. If the computer doesn't boot from your new harddisk instantly, change the boot device settings in your computer's BIOS/UEFI.
If you're using Windows, this first startup can take a bit longer, since Windows 10 searches the proper drivers (which is awesome!), Linux doesn't bother about drivers, thus it should boot instantly.
4. Resizing paritions (optinally)
Only if your new harddisk is bigger than the original, the new partition(s) need to be resized. If you're using Windows, simply use Disk Management (simply search in the start menu) or use GParted when running Linux.
When either GParted or Disk Management start nagging about the partition being in use or something like that, just reboot from your bootable USB and run GParted from there to resize the partitions. The interface is quite self-explanatory.
And you're good to go!
Conclusion
Even though this process might be a bit harder than simply copying your files onto the new harddisk, it is way less time consuming. The only downside is that it can be riscy if you've never used Linux or you misinterpret the output of lsblk and copy the contents of the new (empty) disk onto your (old) existing disk, which erases all your files. But that's where your back-up comes into play.